
In our countdown to classes series here is number

Nuts and bolts – well no bolts yet – that’s for later. Your task today is to:
Make sure your toolbox is packed and ready for action

As with any activity you could spend a lot of money on lots of gadgets and tools but, for quilting I think you really only need a few. Apart from the operational sewing machine, thread and an iron we talked about in previous posts (see below for links), here’s what should be in your toolbox:-
Rotary Cutter – the first rotary cutter was manufactured by Olfa in 1979. Before that quilters had to try to cut accurately with scissors which must have been a nightmare. So you could say rotary cutters put a whole new spin on things (get it?).
Now although Olfa invented the beast I prefer this type:
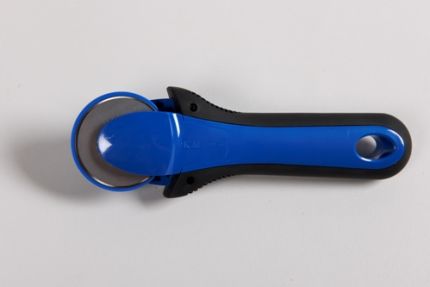
I’ll tell you why – they have a safety lock like pretty well all rotary cutters BUT these ones engage when you apply pressure for cutting. That means you don’t have to REMEMBER to slide the catch up each time you put the thing down.
Make sure you have a new blade – it will change your life it really will. If you are missing part of a cut or hear a noise it’s time to change the blade. You should be able to cut through fabric EASILY. Rotary cutters are just circular razor blades so if it isn’t going well it’s new-blade-time. That should keep your rotary cutter spinning around round baby right round.

Oh and remember what I just said – they are round RAZOR BLADES – that means they are DANGEROUS so be careful when you change the blade and make sure you dispose of the old one sensibly.
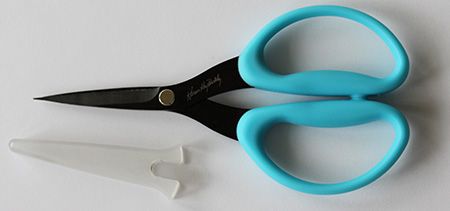
Scissors – the rotary cutter revolutionised quilting but you’ll still need a pair of scissors or two. One larger pair for jobs like cutting the edges of a quilted top before binding it. And maybe a small pair to use for snipping threads. Keep your scissors for cutting fabric only as paper is the natural enemy of the scissor. You have been warned.

Pins – use fine flat-headed pins for your piecing and teeny appliqué pins for, well – appliqué. Go through your supplies and ditch any pins that are bent or blunt as they can damage your work. And a pincushion is useful at this point too.


Plus you might want to invest in a magnetic pickup device or a telescopic magnetic retrieval pen as it is more precisely called. Whatever it’s called get one so you can easily find those stray pins on the floor before they find someone’s foot.

Seam Ripper – no matter how careful you are there’s going to be some reverse sewing at some stage and you’ll need a seam ripper. Invest in a good one. I like the brown-handled Clover ones because they’re very sharp (naturally) and the little ball stops it from damaging fabric when you get a bit carried away. Using a cheap one will only end in tears. Enough said.

Rulers – there are hundreds of rulers available. You don’t need them all! If you want to do homework (and you will) you’ll need a 6 1/2″ x 24 1/2″ ruler – long enough to cut through a length of fabric.
To square up your blocks use a 12 1/2″ square or 14 1/2″ square ruler.
I’d also suggest a 6 1/2″ square ruler to make life easier for you.

Mat – be kind to your cutting mat for although it can heal itself from cuts it does not cope with many things in the sewing room – like heat (don’t get it hot or it will warp) or being warped (don’t store it upright with the weight on itself or it will warp). The manufacturers reckon you should soak them in cool water but, as I have a large mat, where can that be done while keeping it flat?

Also – if you cut 8,435,723 pieces of fabric at the same spot (say the 1/2 metre mark) your mat will eventually wear and you might consider investing in a new one before you saw through your cutting table and amputate your toes!
To start I would recommend a mat 24″ x 36″ because you can cut through a length of fabric folded in half. If you are stretched for space you could get by with a smaller one but, what can I say, size matters!
I also like the spinning mats because it makes it easier to trim small pieces and is particularly useful when you are doing paper piecing (or foundation piecing).
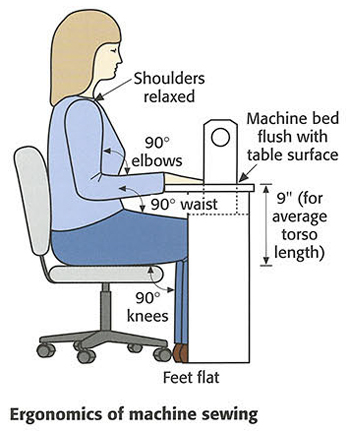
Can you believe that you can make a quilt with just the tools above? Well you can’t! You also need the things we’ve talked about in the last few posts. Oh and one more thing – if you don’t already know – quilting is addictive. You will want to keep going once you start. This means you need a comfortable chair when you’re sewing – one that helps your posture and takes the pressure of your back and shoulders. A set-up like the one below is recommended. I also like the chair with castors because you can swivel to your cutting mat, then to the machine, then the iron in a cut-sew-press kind of routine. Oh and as you swivel round you can pretend you’re in Star Wars on the Millennium Falcon fighting the Imperial troops just before you jump to light speed (or is that just me?).
And there’s two more things you need but you’ll have to stay tuned for those….
Until tomorrow
Happy Quilting
Kaye
If you’ve missed any of the countdown just click here to catch up:-
![]()
![]()
![]()
![]()
![]()
![]()
